This section describes the functions provided by the Load/Save-tabpage:
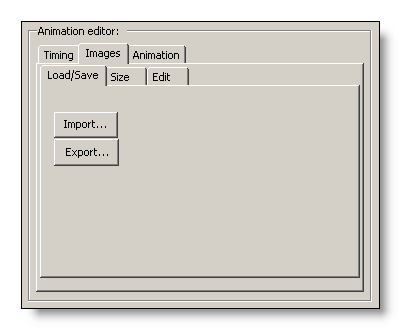
Import
One of the main features of the Animation-Editor is the possibility to create an Animation by just importing any kind of image (supported by .NET) and use it as an Animation-Frame.
When images are to be imported into an Animation, the dimensions and the physical size of the used bitmaps should be considered. The dimensions of the used bitmaps are important because they have an impact on memory-usage and performance. Of course it is perfectly possible to use images with millions of pixels as animation-frames. But images with this dimensions do not make much sense, if they are going to be shown in a tooltip which is only 200 to 500 pixels wide. The details of such high-resolution images get lost anyway in the process and the bitmaps just consume a lot of memory. This, and the internal downscaling of the images, are also notable in terms of performance. It will definitely slow down the Animation when over-dimensioned bitmaps are used as frame-images. On the other hand, the physical size of the images is important because it has a direct impact on the size of the compiled executable. The complete Animation will end up as a resource in the compiled application. Therefore it should be avoided to use multi-megabyte image-files as frame-images, if you don't want your executable to inflate like a balloon. You should also keep in mind, that high-resolution images, which maybe are not that big as files, because they are highly compressed JPEG-files, need to get decompressed and end up using quiet a lot of RAM as Image-objects in your application (e.g.: one single 400k JPEG-image with 1536 x 2048 pixels uses up to 10 mb of RAM when residing in memory as a bitmap).
Even if this points are obvious, it is definitely impractical, if one has to first scale-down every image with the preferred image-editing program and then save the smaller copy to an other location, before it can be imported into a ToolTipsFactory Animation. This could become a very tedious task, specially if an Animation with dozens or even hundreds of frames has to be composed.
The good news is: you don't have to manually scale-down the images you want to import into an Animation. This is done automatically during the import. But of course, the Animation-Editor has to know to which size an imported images has to be scaled. This default frame-size is defined in the Size-tabpage (see "One size fits all". Any image that will be imported into an Animation will be scaled down to the size specified in the Size-tabpage. Now, one may wonder, why this default-size only consists of one value and not two? The solution is, that the longer image-side is scaled to the value specified in the Size-tabpage. And - because the original aspect-ratio is preserved during the operation - the other dimension of the image is also scaled accordingly.
The following example shows the import of a single image into an Animation. The image to be imported is 1920 pixels wide and 612 pixels high. The size of the corresponding file is about 1.3 mb. In order to import this file into the current Animation, the row-selector in the Frames-Grid has to be positioned where the imported image should be inserted (see Picture 1):
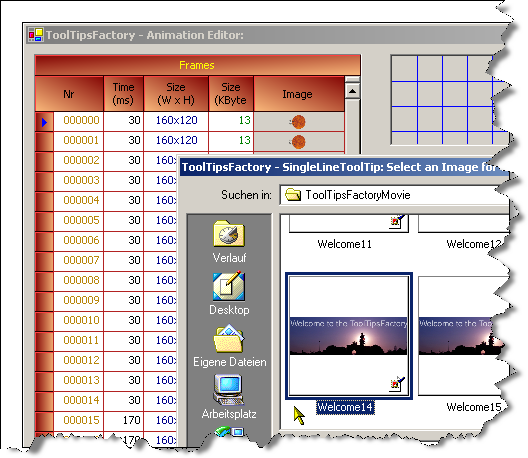
(Picture 1)
After this, the Open File dialog box can be opened by a click on the Import...-button and the desired image-file selected, as shown in Picture 1.
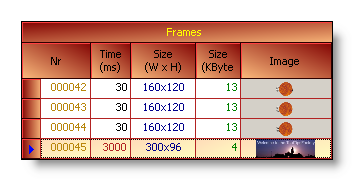
Depending on the size of the imported image, the resizing of the image takes a couple of seconds. After this short delay, the imported image should appear in the Frames-Grid:
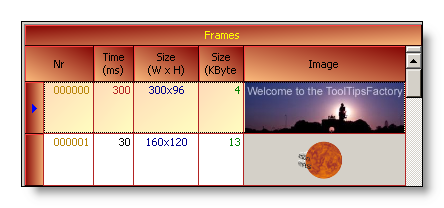
As can be seen from the Frames-Grid, the imported image has been inserted above of (before) the frame selected before of the import. As can also be seen, the image has been correctly scaled down to the desired size and the physical size has been substantially reduced. A default display-time (300 ms) has also been set for the new frame. For this example - because we want the Welcome-Image been visible longer then the rotating logo - the display-time for the imported image will be set to 3000 ms. The resulting Animation - rendered by the AnimationToolTip - looks as shown below:
(Picture 2)
As the rendered Animation shows, it is possible to mix images with different aspect-ratios. But, because the ToolTip does not adapt its size to the changing aspect-ratio of the different frames, all frames have to be rendered in a given area, which is determined by the DefaultWidth of the tooltip (for SingleLineToolTips it's the Font-size that determines the rectangle for the AnimatedSymbol) right before the tooltip is to be displayed. The initial aspect-ratio of the rectangle, where the Animation is rendered, is always based on the first frame of the Animation.
This is quickly demonstrated, by moving the "Welcome"-frame (the imported image) from the start of the Animation to the end:
 |
 (Picture 3) |
As a comparison of Picture 2 and Picture 3 reveals, the aspect-ratio of the first frame in an Animation has a quite notable impact on the result if frames with different aspect-ratios are used. It also shows that in such cases the appearance of the tooltip-Background should also be carefully chosen to match the frames that will not fill the rectangle defined by the first Animation-frame.
In the sample above, the import of one single image was demonstrated. Of course it would be cumbersome and not very efficient, if one has to import a lot of frames one by one. The import-function of the Animation-Designer also permits the import of multiple images from the same directory. The files to be imported can be selected in the Open File dialog box by using the standard selection techniques to select multiple files. Depending on the selection-order, a manual reordering of the imported frames in the Frames-Grid could become necessary.
Another nice - and probably often used - feature of the import-function is its capability to import animated gif-images. Animated gif-images are normal bitmaps, when displayed by a program that does not support animated gifs, but turn into movie-clips when rendered by a program that supports this special format. Animated gif-files are still widely used in the internet to display small animations on web-pages. On the internet there is a wide range of resources available. First of all, there are lots of web-sites with huge collections of nice animated gif-files which are either freely available or can be licensed or bought for moderate prices. There are also many great tools around which are specially aimed to the creation of animated gifs.
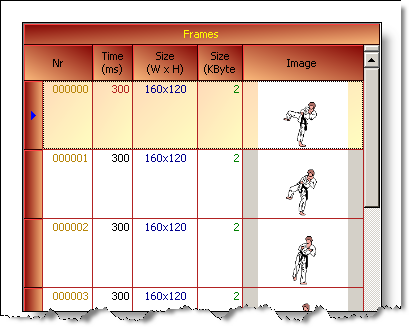
An animated gif-file is imported as any other image. The only difference is, that each frame of the gif-animation will be imported as a ToolTipsFactory AnimationFrame. The Frames-Grid below shows the list of frames after the import of an animated gif-file into an empty Animation:
Export
Even if this option is probably seldom used, it is also possible to export one or more frame-images to individual files. To export one or more images, they have to be selected in the Frames-Grid. The export is initiated by clicking on the Export...-button which will open a Save File dialog box. In this dialog box the the target directory and a file-type/Bitmap-format can be selected. The target-file can either be selected (if it already exists) or a name for the file can be specified in the appropriate field.
If more then one frame have been selected for export, the given filename is used as a basename to create the filenames for all exported frames. The scheme for the generated filenames is "<basename><frame-nr>.<extension>".
E.G.: With three frames (0,5 and 14) selected to be exported, "Karate" as basename and "PNG-Images" as selected graphics-format, the following three files would be created:
- Karate0.png
- Karate5.png
- Karate6.png