ToolTipsFactory

Task-based Tutorials - How to use ToolTips with the ListBox-control

This article discusses how the ToolTipsFactory tooltips can be used with the ListBox-control provided by the .NET-Framework. 


Listsboxes are widely used controls to present lists of items to application-users. The items in this lists can be plain strings, which just represent themselves (e.g. a list of city names) or they can be more complex objects, which appear in the (visible) list with a descriptive name provided by the object, but where most of the information held by a specific object (item) is still hidden. Depending on the kind of information and the function of a ListBox-control in an application, different scenarios are possible for the usage of the ToolTipsFactory tooltips in conjunction with the ListBox-control.

The most basic use of a tooltip on a ListBox-control, is to give a generic description about the information presented by the ListBox. Such a generic (static) description is usually assigned to the tooltip of the ListBox at design-time, as described in the section on "Provided properties" and other sections of the ToolTipsFactory documentation. In this case, the tooltip popping-up for a specific ListBox-control would always show the same content when the cursor moves over the control:

Of course, this usage of the ToolTipsFactory tooltips would never justify this article. As mentioned above, this has been extensively discussed in other sections.

When used on a ListBox-control, the ToolTipsFactory tooltips can do much more then just display static content. For a listbox, where "the listed string is the message", there is no need for dynamic tooltips. But in cases, where the entries in the listbox are just references to complex objects containing more information, the tooltips provide the means to present more information about a specific list-entry to the user in a really natural way.

In the following we are going to discuss two different approaches on how the MultiLineToolTip component can be used to dynamically show more information about a list-entry, but the described techniques apply to the other tooltip components as well. The source-code and the corresponding Visual Studio project for this sample can be found in the "<ToolTipsFactoryHomeDir>.\Samples\ListBox1"-directory.

For both approaches we are going to use a set of instances of the Customers-class as it is defined below:

Class Customer

Friend Name As String = ""

Friend LastName As String = ""

Friend City As String = ""

Friend Birthdate As Date

Friend CustomerID As Long

Friend PendingOrders As Integer

Sub New(ByVal id As Long, ByVal custName As String, _

         ByVal custLastName As String, ByVal custCity As String, _

         ByVal custBirthdate As String, _

         ByVal pendorders As Integer)

'Assign the values to the corresponding members...

CustomerID = id

Name = custName

LastName = custLastName

City = custCity

Birthdate = Date.Parse(custBirthdate)

PendingOrders = pendorders

End Sub


Public Overrides Function ToString() As String

    Return LastName & ", " & Name

End Function

End Class

Listing 1

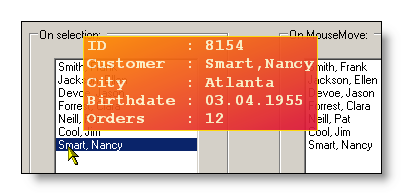
The goal of the first approach, we are going to elaborate, will be to make the MultiLineToolTip display all information of the Customer-object currently selected in the ListBox-control.

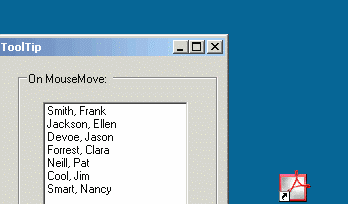
In the sample-project a ListBox-control (lbCustomers) is going hold a list of this Customer-objects, as shown by the image:

This Customer-objects are created and assigned to an ArrayList (customersList) in the Load-event of the form (Form1). This customersList is then assigned to the ListBox-control (lbCustomers) as DataSource (see Listing 2).

Private Sub Form1_Load(ByVal sender As Object, ByVal e As EventArgs) _

                Handles MyBase.Load

'Create the Customer-objects and add them to the customersList....

customersList.Add(New Customer(10234, "Frank", "Smith", _

                             "New York", "3.4. 1955", 12))

customersList.Add(New Customer(9225, "Ellen", "Jackson", _

                            "Detroit", "12.12. 1966", 48))

customersList.Add(New Customer(11333, "Jason", "Devoe", _

                            "Miami", "11.11. 1911", 225))

customersList.Add(New Customer(16001, "Clara", "Forrest", _

                            "Denver", "6.7. 1975", 3))

customersList.Add(New Customer(4042, "Pat", "Neill", _

                            "Las Vegas", "9.9. 1982", 35))

customersList.Add(New Customer(12317, "Jim", "Cool", _

                            "Nome", "2.7. 1963", 8))

customersList.Add(New Customer(8154, "Nancy", "Smart", _ 

                            "Atlanta", "3.4. 1955", 12))

'Define the customersList as DataSource for the listbox...

Me.lbCustomers.DataSource = customersList

'...and make sure, no item is selected.

Me.lbCustomers.SelectedIndex = -1


'We need this clone of the customersList to show another approach

'on how the MultiLineToolTip can dynamically change its content...

customersList2 = customersList.Clone

'...and assign it as DataSource for the second listbox (lbCustomers2) 

'on Form1 

Me.lbCustomers2.DataSource = customersList2

Me.lbCustomers2.SelectedIndex = -1

End Sub

Listing 2

The code in Listing 1 and Listing 2 is only needed to get some actual data in place for our example. In a real application, the DataSource for the ListBox will most probably be a some data from a database and not hard-coded values. 

After this prelude, we can now concentrate on how we can make the tooltip for lbCustomers display all information about the selected object.

Obviously, this has to happen in one of the SelectedIndexChanged- or SelectedValueChanged-events, because the information displayed in the tooltip should change as soon as another list-item is selected. For this example, we have opted for the SelectedIndexChanged-event, as shown below:

Private Sub lbCustomers_SelectedIndexChanged(ByVal sender As Object, _

                                             ByVal e As EventArgs) _ 

                                Handles lbCustomers.SelectedIndexChanged

'If no Customer is selected...
If
Me.lbCustomers.SelectedIndex = -1 Then

    '...the tooltip should reflect this as well.

    Me.MultiLineTT.GetMultiLineToolTip(lbCustomers) _ 

    .Text = "No customer selected!"

   Exit Sub

End If


Dim newText As String = ""

Dim c As Customer

'Get the Customer-object selected in the listbox...

c = CType(Me.lbCustomers.SelectedItem, Customer)

'With the values provided by the Customer-object, we can

'build the (multiline) string to be displayed by the

'tooltip.

newText &= "ID        : " & c.CustomerID.ToString & vbNewLine

newText &= "Customer  : " & c.LastName & "," & c.Name & vbNewLine

newText &= "City      : " & c.City & vbNewLine

newText &= "Birthdate : " & c.Birthdate.ToShortDateString & vbNewLine

newText &= "Orders    : " & c.PendingOrders.ToString


'This is the crucial line of code, which makes the tooltip

'display the new text. It also makes sure that the tooltip

'pops-up again, if its AutoPopDelay already has expired.

Me.MultiLineTT.Start(lbCustomers, newText)

End Sub

Listing 3

The code in Listing 3 shows that it is relatively easy to change the tooltip-content according to the selected list-item. Most part of this code consists of the logic to handle the different states of the ListBox (no item selected/item selected) and the composition of the new tooltip-content. The actual change of the tooltip-content is done in one single line of code. 

If the sample project is compiled and run, the listbox on the left side (in the "On selection:"-box) should first display the message "No customer selected!" in the tooltip, when the mouse is moved over the it, because right after the program start, no item in the listbox is selected. Only after selecting an item, a tooltip with the full information about the selected Customer-object should pop-up:

If another list-entry is selected, the content of the tooltip should instantly display the details of the new Customer. According to the time specified for the AutoPopDelay-property of the component (MultiLineTT), the tooltip will disappear as soon as this time elapses. Only the selection of another or the same item, will bring the tooltip back. 

Maybe - while running the sample program - you have noted that there is another GroupBox ("On MouseMove:") on the form with a identical copy of the Customers-ListBox. We are going to use this second listbox to demonstrate another way to make use of the dynamic capabilities of the ToolTipsFactory tooltip components.

While the first approach made the tooltip content change with every change of the selected list-entry, the second approach makes the tooltip display the details of the Customer-object over which the mouse-pointer is currently hovering. How this looks is shown in the image below, but it's actually more fun to test the new behavior directly in the compiled sample program:

This is obviously a very elegant way to provide the user with more details about the list-entries. There's no clicking and/or opening and closing of additional windows needed, just to have a glance at the details of a list-entry. 

Now, after having seen, what the second approach does, we should have a closer look at how it's doing it.

This second ListBox (lbCustomers2) is initialized the same way in the Form.Load event-handler as the first one (see Listing 2). What we can assume, is that the code, which constructs the new text for the tooltip as soon as the Customer, to which the mouse is pointing, changes, must be very similar to the code used in the first approach (see Listing 3). We can also be pretty sure that this code does not belong into the SelectedIndexChanged event-handler in order to detect that the list-entry pointed to by the mouse has changed. But where should this code be placed and how can be figure out, over which list-item the mouse-cursor is currently hovering? The ListBox-control has no event that fires when the mouse enters the row of another list-item. So, how then, can we find out when this happens and then set the tooltip-text accordingly?

It seems, that we have to do all this in the MouseMove-event of the the ListBox (lbCustomers2). Whenever the mouse is moved over the listbox, the exact mouse-position has to be taken and the list-entry for this position evaluated. The ListBox-control does not have an event that fires, when the boundaries between list-entries are crossed by the mouse, but at least it provides a function that permits to translate the mouse-position into the index of the corresponding list-entry. The code, how this translation is done, can be found in the listing of the MouseMove event-handler of lbCustomers2:

Private Sub lbCustomers2_MouseMove(ByVal sender As Object, _

                                    ByVal e As MouseEventArgs) _

                 Handles lbCustomers2.MouseMove

'We need this in order to detect the crossing

'from one entry to another...

Static Dim oldIndex As Integer = -1

Dim newText As String = ""

'Here we get the index of the list-entry for

'the current mouse-coordinates...

Dim newIndex = lbCustomers2.IndexFromPoint(e.X, e.Y)


'If the entry, to which the mouse points

'did not change, there is no need to change the text

'of the tooltip.

If newIndex = oldIndex Then Exit Sub

If newIndex = -1 Then

    'If the mouse does not point to an actual element of

    'the list, the new text for the tooltip should

    'explicitly state this.

    newText = "No customer selected!"

Else

 'Get the Customer-object selected in the listbox...

 Dim c As Customer

 c = CType(Me.lbCustomers2.Items.Item(newIndex), Customer)

 'With the values provided by the Customer-object, we can

 'build the (multiline) string to be displayed by the

 'tooltip.

 newText &= "ID        : " & c.CustomerID.ToString & vbNewLine

 newText &= "Customer  : " & c.LastName & "," & c.Name & vbNewLine

 newText &= "City      : " & c.City & vbNewLine

 newText &= "Birthdate : " & c.Birthdate.ToShortDateString & vbNewLine

 newText &= "Orders    : " & c.PendingOrders.ToString

End If


'This is the crucial line of code, which makes the tooltip display

'the new text.

Me.MultiLineTT.GetMultiLineToolTip(lbCustomers2).Text = newText


'newIndex is the index for which the tooltip currently

'displays additional information. Therefore, we set oldIndex

'to be the current index (newIndex).

oldIndex = newIndex


'If the AutoPopDelay of MuliLineTT has elapsed (Active=False),

'the(ToolTip) will not be displaying anymore. If we want to

'display the additional information for the currentitem,

'it must be restarted...

If Me.MultiLineTT.Active = False Then

    Me.MultiLineTT.Start(Me.lbCustomers2)

End If

End Sub

Listing 4

Obviously this approach is not much more complicated as the first one. With this we have at disposition two different - but equally easy to use - ways, how the tooltips can provide additional information about listbox-entries.

This samples did focus on the MultiLineToolTip, but it would be equally easy to change the content of SingleLine- or ImageToolTips. For instance, with a SingleLineToolTip it would be possible to pop-up additional textual information about the list-entry and to display a small photo of the person (assuming the Customer-class provides such a property). The lines of code to be inserted at the correct place in Listing 4 would look like this:


'...

'This is the crucial line of code, which makes the tooltip display

'the new text.

Me.SingleLineTT.GetSingleLineToolTip(lbCustomers2).Text = newText

'Here we assign the image to be displayed...

Me.SingleLineTT.GetSingleLineToolTip(lbCustomers2).Override _

.Symbol = c.Photo

'...